


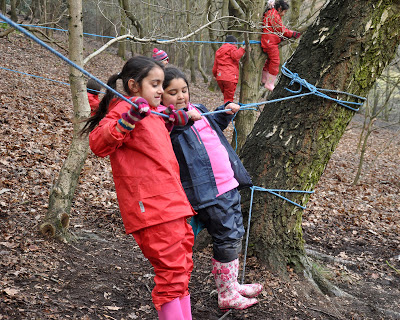
 I’ve written before about building rope bridges among the trees and how fantastic they are for children’s motor development, encouraging social skills and confidence and being loads of fun.
What I have also found is that adults who work with children are equally as fascinated and enjoy learning the skills of tying the knots. I thought I would leave some notes here for a refresher for anyone who needs it (you know who you are 🙂 ) and to maybe inspire you to have a try at tying rope bridges if you haven’t yet.
I’ll put in links to animated knot videos and drawings to help you along if you need it, but here’s the thing about knots, some people learn by watching, some people learn by listening, some just have to have a bit of string and be shown. That’s the way different people learn and it doesn’t mean one way is better.
Trees:
You want to tie ropes from trees that are solid and secure. Give them a good look over, lean against them and look up noticing if they move too much when you put weight against them. Check there are no dead branches in the crown of the tree that could show a weakness or cause problems. Choose trees that are a good size, not so massive that all your rope gets used up tying on to them but big enough.
Protection:
If you are going to leave them up and the tree are smooth skinned like beech or young ash trees, etc. then put something like carpet or thick fabric under the ropes to protect the bark.
Rope:
I use 10ml (or thicker) polyprop rope. It’s that cheapish blue stuff. Climbing rope can be too stretchy unless you have static climbing rope. For length go for two pieces that are as long as a piece of string(!). Mine are about 10 metres each.
Once the children are interested in the idea I encourage them to be fully involved in tying the bridges, taking over completely after the first couple of times with my help. The older children tend to make them more challenging, going up slopes or with non-parallel lines.
Tying the knots:
First end is wrapped around the tree three or four times. Tie with a couple of half hitches. The turns around the tree take the pressure off the knot.
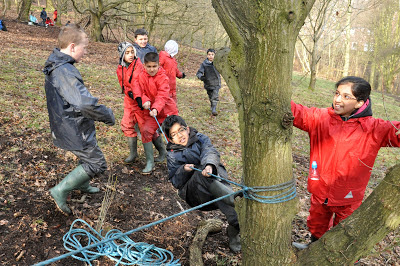
Wrap the second end of the rope around another tree, leaving a long long tail. Go around the tree once and pull it tight “heave, heave etc”, I love getting the children involved at this stage, it takes much longer this way but is so much more fun and they definitely use the bridges more if they have built them.
The working end of the rope then goes over the top of the standing end and back round the tree in the opposite direction.
This is quite heard to type how to do this bit, so I have done a couple of doodles that may (or may not) help.
This end of the rope is tied to another tree.
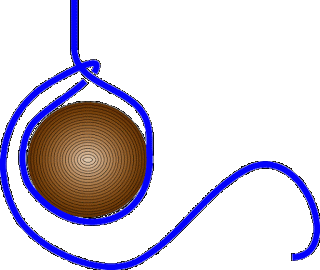
This end of the rope is doing all the work
Repeat this 3-4 times so the rope is pulled tighter each time.
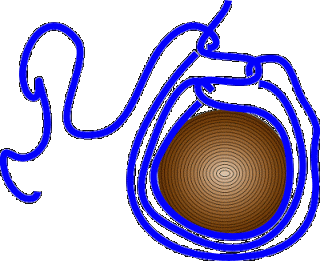
The zig zagging of each turn, pulled really tight, with more of the “heave, heave” shortens the rope. It is this which pulls it tight.
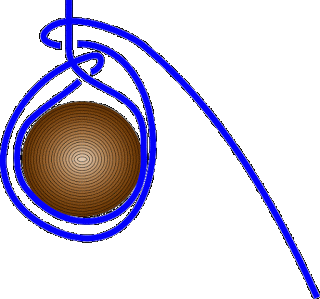
The zig zagging of each turn, pulled really tight, with more of the “heave, heave” shortens the rope. It is this which pulls it tight. With the end of the rope, wrap it round and round in a twizzly timber hitch. This stops it over-tightening and is why you need to make sure you have a long long tail on your rope. If you haven’t got a long end on the rope then a couple of half hitches works well but can get a bit fiddly to untie.
Repeat with the second rope, about a child’s height above the first rope. They don’t need to be far of the ground to be challenging and the wobbliness adds to the physical challenge.
Let me know how you get on!


Nice & awesome blog, i really love reading on it. Thanks for sharing!
Ketchikan Alaska Vacation
I use rope courses quite a bit the children love them and you can see their confidence grow instantly as well as the obvious physical benefits.